Have you decided to write tests for your Yii project? Awesome, this post will be useful for you =D
I’ve started to work with Yii recently, and I have to be honest that is not my favourite PHP framework, Symfony is on the top my list, but we can’t ignore one aspect so important for the software cycle life because of personal preferences.
If you have tried to write tests for the Yii using mock objects for active record model you will probably find yourself that isn’t an easy task. This guide has the mission to help you to set up your test environment; this doc is using the Yii 1.0 documentation as support to configure the test environment, below you can figure out how to start from scratch to write unit and functional tests for this or anything else projects using Yii.
Step-by-step guide
There are a few steps to set up the whole environment:
1. Prepare the database test
2. Configuration files
3. The folders structure for tests
4. Creating fixtures
5. Writing the test
1. Prepare the database test
As mentioned above is a little bit difficult to mock the Active Record methods in Yii, (Take this serious, because I have tried so hard to do that =( ) so is necessary configure a parallel database to hold the entire fixture data. The initial step is to create a new database separate only for the tests, like “database_for_tests” and copy only the tables without data into this new database from the original one; the data will be filled by the fixtures later. We have to be careful with too many tests which use the database because running these tests can make the process quite slow.
2. Configuration files
Is necessary to write or modify two files. The first one is the bootstrap.php file, localised inside the your_project/protected/tests folder, and it may look like this sample below:
<?php
$yiit='path/to/yii/framework/yiit.php';

$config=dirname(__FILE__).'/../config/test.php';

require_once($yiit);
require_once(dirname(__FILE__).'/WebTestCase.php');
Yii::createWebApplication($config);
Probably it won’t be necessary to change anything on this file because it is already configured. The second file to have our attention is the test.php inside the your_project/protected/config, have a look at this sample.
<?php
return CMap::mergeArray(
  require(dirname(__FILE__) . '/main.php'),
  array(
    'components' => array(
      'fixture' => array(
        'class' => 'system.test.CDbFixtureManager',
      ),
      /* uncomment the following to provide test database connection */
     'db'=>array(
       'connectionString' => 'mysql:host=127.0.0.1;dbname=database_for_tests',
       'emulatePrepare' => true,
       'username' => 'smarts',
       'password' => 'smarts',
       'charset' => 'utf8',
      ),
   ),
 )<br>);
As you probably realised this file is similar to the main database configuration file of your Yii project, on this sample I’m using the same database configured on the previous step database_for_tests.
Important: Never use the same database of your project,
because your data will be destroyed or modified when
running the tests, pay attention to this.
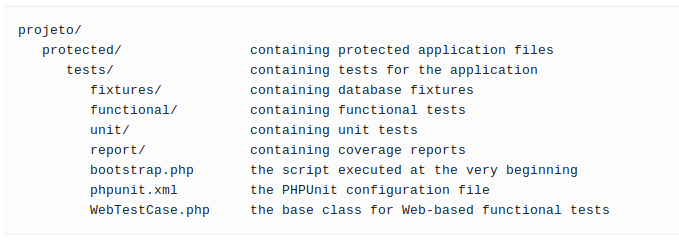
3. The folders structure for tests
Below you can see a map where the fixtures, unit and functional will be written and saved within the project.
4. Creating fixtures
The automated tests will be executed many times, and to ensure that this process is repeatable the fixtures will help us. When running tests we must guarantee that they will always be to keep that world the same before and after tests execution, in a known state, every test must run on this premise. So to this happen, before all tests run, it reset all tables relevant to the test to some known state, that is the reason we use a separate database for the tests. As said above, the fixture data will be stored under the protected/tests/fixtures, you can change this folder to a different one if you want configuring the CDbFixtureManager::basePath property in the application configuration. The following piece of code is a fixture sample, and the file is product_asset_map.php named after the table’s name on database test in a lowercase way.
The code is a standard key array, where each entry represents a row on the table product_asset_map when you run the tests which use this fixture this data will be inserted into the table for to be used on your test.
When CDbFixtureManager is referenced for the first time, it will go through every fixture file and use it to reset the corresponding table.
<?php
return array(
    'sample1'=>array(
        'name'=>'Zinedine Zidane',
        'age'=> 45,
        'country'=> 'France',
        'address'=> '230 street x, Madrid',
    )
);
5.Writing the test
This is where the fun begins =), if you are familiar to write a unit test using PHPUnit you won’t have any difficulty here, just few thing are different as will see on the next lines. Each file by convention has to use the Test suffix on its file name and extends from CDbTestCase (If you are testing active record model class, like our next case) or CTestCase (Generic unit tests). Because PHPUnit_Framework_TestCase is the ancestor for the both classes, we can use all methods inherited from this class.
<?php

class UserTest extends CDbTestCase
{

public $fixtures = [
  'user' => 'User'
];

public function setUp()
{
  parent::setUp();
}

public function testCheckIfTheNameIsRight()
{
  $expected = $this->products['row1']['name'];

  $this->assertEquals(
    $expected,
    User::model()->checkName('Zinedine Zidane'),
    "The name should be equal"
  );
}
Inside the file, the main difference is the fixture statement, in our case above, the array represents the
mapping from our model class User, we can also use the table name instead of the class when using the class name the corresponding table name will use as fixture table. Now, we can use the data from our fixture user.php in our tests using the products property as well as its methods,
E.g. `$this→property`.
So, that’is it, folks!
Related articles
http://www.yiiframework.com/doc/guide/1.1/pt/test.unit